Introduction
Three-legged authentication is an OAuth 2.0 authentication process that you can use to enable your application to access user resources through Autodesk's API. In this process, users will grant access to their resources through your application without sharing their passwords with your application.
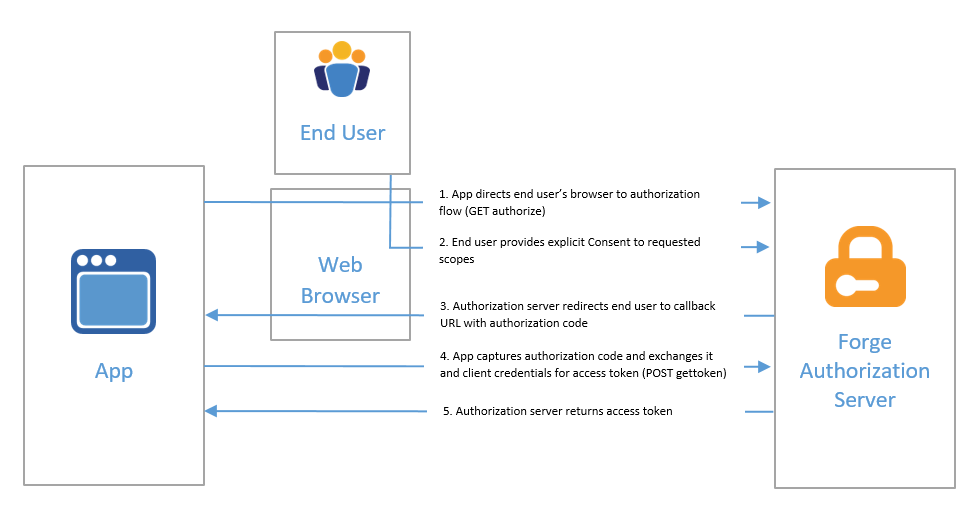
However, this also comes with some drawbacks as it requires multiple steps to obtain a token. In this article,and to keep continue the series Get a 3-Legged APS Token With Python, I will guide you on how to obtain a three-legged token using Csharp. I will simplify it by performing them within a Csharp Console and Desktop App.
When I look around the open source, I just feel like why the step so important but why we make it so complicated with the documentation. So I will try to make it simple and easy to understand for you.
How to Get a 3-Legged Token With Csharp
To get a 3-legged token with Csharp, you need to follow these steps:
Step 1: Setting up the Environment
using System.Diagnostics;
using System.Net;
using System.Text;
using Newtonsoft.Json;Step 2: Obtaining Client ID and Client Secret
var clientId = Environment.GetEnvironmentVariable("APS_CLIENT_ID");
var clientSecret = Environment.GetEnvironmentVariable("APS_CLIENT_SECRET");Step 3: Creating the Authentication Class
public class Auth
{
    private readonly string client_id;
    private readonly string client_secret;
    private string access_token;
    private string token_type;
    private int expires_in;
    private string refresh_token;

    public Auth(string clientId, string clientSecret)
    {
        client_id = clientId;
        client_secret = clientSecret;
    }

    // Methods for authentication...
}Step 4: Initiating Authentication Flow, this step make sure that you added the callback url to your application.
Auth auth = new Auth(clientId, clientSecret);
var callBackUrl = "http://localhost:8080/api/auth/callback";
var scopes = "data:read data:write data:create data:search bucket:create bucket:read bucket:update bucket:delete code:all";
var token = await auth.Auth3Leg(callBackUrl, scopes);Step 5: Generating Authorization URL
private string GetAuthUrl(string callbackUrl, string scopes)
{
    return $"https://developer.api.autodesk.com/authentication/v2/authorize?response_type=code&client_id={client_id}&redirect_uri={callbackUrl}&scope={scopes}";
}Step 6: Opening Default Browser
private void OpenDefaultBrowser(string url)
{
    try
    {
        Process.Start(new ProcessStartInfo(url) { UseShellExecute = true });
    }
    catch (Exception ex)
    {
        Console.WriteLine($"Error opening default browser: {ex.Message}");
    }
}Step 7: Listening for Callback
 private async Task<Token> StartListener(string callbackUrl)
    {
        var listener = new HttpListener();
        listener.Prefixes.Add(callbackUrl + "/");
        listener.Start();

        Console.WriteLine($"Listening for callback at: {callbackUrl}");

        while (true)
        {
            var context = await listener.GetContextAsync();
            var request = context.Request;
            var response = context.Response;

            // Extract code from callback URL
            var query = request.Url.Query;
            var queryParams = System.Web.HttpUtility.ParseQueryString(query);
            var code = queryParams["code"];

            var resultToken = await HandleCallback(callbackUrl, code);
            access_token = resultToken.access_token;
            token_type = resultToken.token_type;
            expires_in = resultToken.expires_in;
            refresh_token = resultToken.refresh_token;

            var responseString = "Authentication successful. You can close this window now.";
            var buffer = System.Text.Encoding.UTF8.GetBytes(responseString);
            response.ContentLength64 = buffer.Length;
            await response.OutputStream.WriteAsync(buffer, 0, buffer.Length);
            response.Close();

            break;
        }

        listener.Stop();

        return new Token(access_token, token_type, expires_in, refresh_token);
}Step 8: Handling Callback
  private async Task<Token> HandleCallback(string callbackUrl, string code)
    {
        var tokenUrl = "https://developer.api.autodesk.com/authentication/v2/token";
        var payload = $"grant_type=authorization_code&code={code}&client_id={client_id}&client_secret={client_secret}&redirect_uri={callbackUrl}";

        using (var client = new HttpClient())
        {
            var content = new StringContent(payload, Encoding.UTF8, "application/x-www-form-urlencoded");
            var response = await client.PostAsync(tokenUrl, content);

            if (!response.IsSuccessStatusCode)
            {
                var errorMessage = await response.Content.ReadAsStringAsync();
                throw new Exception($"Failed to retrieve token: {errorMessage}");
            }

            var jsonResponse = await response.Content.ReadAsStringAsync();
            var resultToken = ParseToken(jsonResponse);
            return resultToken;
        }
    }
    private Token ParseToken(string json)
    {
        var token = JsonConvert.DeserializeObject<Token>(json);
        return token;
}Step 9: Define Token Class
public class Token
{
    public string access_token;
    public string token_type;
    public int expires_in;
    public string refresh_token;

    public Token(string accessToken, string tokenType, int expiresIn, string refreshToken)
    {
        access_token = accessToken;
        token_type = tokenType;
        expires_in = expiresIn;
        refresh_token = refreshToken;
    }
}So now, you can run the console to see the result of the 3-legged token like a video below.
Authorization Code Flow with PKCE
The Authorization Code Flow with PKCE is an extension of the Authorization Code Flow. It is recommended for mobile and native applications to prevent authorization code interception attacks. The PKCE (Proof Key for Code Exchange) is a security extension that ensures the authorization code exchange is secure.

To get a 3-legged token with PKCE, you need to follow these steps:
Step 1: Setting up the Environment
using System;
using System.Collections.Generic;
using System.Linq;
using System.Net.Http;
using System.Net;
using System.Security.Cryptography;
using System.Text;
using System.Text.RegularExpressions;
using System.Threading.Tasks;
using System.Web;
using System.Windows;
using System.Windows.Controls;
using System.Windows.Data;
using System.Windows.Documents;
using System.Windows.Input;
using System.Windows.Media;
using System.Windows.Media.Imaging;
using System.Windows.Navigation;
using System.Windows.Shapes;
using System.Xml.Linq;
using Newtonsoft.Json.Linq;Step 2: Creating the MainWindow Class
namespace aps_tookit_auth_3leg_pkce
{
    public partial class MainWindow : Window
    {
        private static Random random = new Random();

        public MainWindow()
        {
            InitializeComponent();
        }

        // Methods for authentication...
    }
}Need make sure that you also added xaml file for the MainWindow class because this is example for WPF Desktop App.
<Window x:Class="aps_tookit_auth_3leg_pkce.MainWindow"
        xmlns="http://schemas.microsoft.com/winfx/2006/xaml/presentation"
        xmlns:x="http://schemas.microsoft.com/winfx/2006/xaml"
        xmlns:d="http://schemas.microsoft.com/expression/blend/2008"
        xmlns:mc="http://schemas.openxmlformats.org/markup-compatibility/2006"
        xmlns:local="clr-namespace:aps_tookit_auth_3leg_pkce"
        mc:Ignorable="d"
        Title="Autodesk Auth PCKE" Height="300" Width="600">
    <Grid Margin="5,5,5,5">
        <Grid.RowDefinitions>
            <RowDefinition Height="25"/>
            <RowDefinition Height="40"/>
            <RowDefinition Height="25"/>
            <RowDefinition Height="30"/>
            <RowDefinition/>
        </Grid.RowDefinitions>
        <Label Content="Click login to start:" ></Label>
        <Button Margin="0,0,0,5"
                Grid.Row="1"
                x:Name="btnLogin"
                Click="LoginOnClick"
                Background="WhiteSmoke"
                Content="Login"/>
        <Label Foreground="Red" Grid.Row="2"
               x:Name="lbnResult"></Label>

        <StackPanel Grid.Row="3" Orientation="Horizontal">
            <Button Margin="0,0,0,5"
                    Grid.Row="3"
                    x:Name="btnRefresh"
                    Click="RefreshTokenOnClick"
                    Background="WhiteSmoke"
                    Content="Refresh Token"></Button>
            <Button Content="Get User Info"
                    Margin="5,0,0,5"
                    Background="WhiteSmoke"
                    Click="GetUserInformationOnClick"></Button>
        </StackPanel>
        <TextBox x:Name="tbxToken" Grid.Row="4" AllowDrop="True" TextWrapping="Wrap"></TextBox>
    </Grid>
</Window>Step 3: Generating a Random String : The PKCE requires a random string to be generated for the code challenge. This string should be at least 43 characters long and contain only alphanumeric characters and the following symbols: "-", ".", "_", and "~".
public static string RandomString(int length)
{
    const string chars = "ABCDEFGHIJKLMNOPQRSTUVWXYZ0123456789";
    return new string(Enumerable.Repeat(chars, length)
            .Select(s => s[random.Next(s.Length)]).ToArray());
}Step 4: Generating Code Challenge: The code challenge is a base64 URL-encoded hash of the code verifier. The code verifier is a random string generated by the client.
private static string GenerateCodeChallenge(string codeVerifier)
{
    var sha256 = SHA256.Create();
    var hash = sha256.ComputeHash(Encoding.UTF8.GetBytes(codeVerifier));
    var b64Hash = Convert.ToBase64String(hash);
    var code = Regex.Replace(b64Hash, "\\+", "-");
    code = Regex.Replace(code, "\\/", "_");
    code = Regex.Replace(code, "=+$", "");
    return code;
}Step 5: Handling Login Button Click : When the user clicks the login button, the application will generate a code verifier and code challenge, and then open the default browser to the authorization URL.
private void LoginOnClick(object sender, RoutedEventArgs e)
{
    string codeVerifier = RandomString(64);
    string codeChallenge = GenerateCodeChallenge(codeVerifier);
    Global.codeVerifier = codeVerifier;
    Global.ClientId = aps_tookit_auth_3leg_pkce.Resources.ClientId;
    Global.CallbackURL = aps_tookit_auth_3leg_pkce.Resources.CallbackUrl;
    RedirectToLogin(codeChallenge);
    btnLogin.Content = "Proceed in the browser!";
}Step 6: Redirecting to Login Page : The application will redirect the user to the login page with the code challenge and other parameters.
private void RedirectToLogin(string codeChallenge)
{
    string[] prefixes =
    {
        "http://localhost:8080/api/auth/"
    };
    System.Diagnostics.Process.Start($"https://developer.api.autodesk.com/authentication/v2/authorize?response_type=code&client_id={Global.ClientId}&redirect_uri={HttpUtility.UrlEncode(Global.CallbackURL)}&scope=data:read&prompt=login&code_challenge={codeChallenge}&code_challenge_method=S256");
    _ = SimpleListenerExample(prefixes);
}Step 7: Setting up Simple HTTP Listener: The application will set up a simple HTTP listener to listen for the callback from the authorization server.
public async Task SimpleListenerExample(string[] prefixes)
{
    if (!HttpListener.IsSupported)
    {
        throw new NotSupportedException("HttpListener is not supported in this context!");
    }
    // URI prefixes are required,
    // for example "http://contoso.com:8080/index/".
    if (prefixes == null || prefixes.Length == 0)
        throw new ArgumentException("prefixes");

    // Create a listener.
    HttpListener listener = new HttpListener();
    // Add the prefixes.
    foreach (string s in prefixes)
    {
        listener.Prefixes.Add(s);
    }
    listener.Start();
    //Console.WriteLine("Listening...");
    // Note: The GetContext method blocks while waiting for a request.
    HttpListenerContext context = listener.GetContext();
    HttpListenerRequest request = context.Request;
    // Obtain a response object.
    HttpListenerResponse response = context.Response;

    try
    {
        string authCode = request.Url.Query.ToString().Split('=')[1];
        await GetPKCEToken(authCode);
    }
    catch (Exception ex)
    {
        tbxToken.Text = "An error occurred!";
        lbnResult.Content= ex.Message;
    }

    // Construct a response.
    string responseString = "<HTML><BODY> You can move to the form!</BODY></HTML>";
    byte[] buffer = System.Text.Encoding.UTF8.GetBytes(responseString);
    // Get a response stream and write the response to it.
    response.ContentLength64 = buffer.Length;
    System.IO.Stream output = response.OutputStream;
    output.Write(buffer, 0, buffer.Length);
    // You must close the output stream.
    output.Close();
    listener.Stop();
}Step 8: Obtaining PKCE Token: The application will exchange the authorization code for a token using the PKCE method.
private async Task GetPKCEToken(string authCode)
{
    try
    {
        var client = new HttpClient();
        var request = new HttpRequestMessage
        {
            Method = HttpMethod.Post,
            RequestUri = new Uri("https://developer.api.autodesk.com/authentication/v2/token"),
            Content = new FormUrlEncodedContent(new Dictionary<string, string>
            {
                { "client_id", Global.ClientId },
                { "code_verifier", Global.codeVerifier },
                { "code", authCode},
                { "scope", "data:read" },
                { "grant_type", "authorization_code" },
                { "redirect_uri", Global.CallbackURL }
            }),
        };

        using (var response = await client.SendAsync(request))
        {
            response.EnsureSuccessStatusCode();
            string bodystring = await response.Content.ReadAsStringAsync();
            JObject bodyjson = JObject.Parse(bodystring);
            lbnResult.Content = "You can find your token below";
            tbxToken.Text = Global.AccessToken = bodyjson["access_token"].Value<string>();
            Global.RefreshToken = bodyjson["refresh_token"].Value<string>();
        }
    }
    catch (Exception ex)
    {
        tbxToken.Text = "An error occurred!";
        lbnResult.Content = ex.Message;
    }
}So now, you can run the desktop app to see the result of the 3-legged token with PKCE like a video below.
Revit Add-in Authentication with PKCE
If you want to use PKCE for Revit Add-in, you need to understand about the IExternalEventHandler to hander method use Await and Task. So you can follow the code below to get the token with PKCE. Luckily, have so many authors published some open source and I will introduce you some project before you start playing with Revit Add-in.
RevitTask - https://github.com/WhiteSharq/RevitTask
ricaun.Revit.UI.Tasks - https://github.com/ricaun-io/ricaun.Revit.UI.Tasks
Revit.Async - https://github.com/KennanChan/Revit.Async
In this tutorial, I will use the Librrary RevitTask from ricaun to get the token with PKCE. So you can follow the code below to get the token with PKCE.
 <ItemGroup>
    <PackageReference Include="Newtonsoft.Json" Version="13.0.3" />
    <PackageReference Include="ricaun.Revit.UI.Tasks" Version="1.0.0" />
</ItemGroup>The step for authentication will be same with turotial above, but you need to use the RevitTask to handle the method with IExternalEventHandler like a code below.
[Transaction(TransactionMode.Manual)]
public class Command : IExternalCommand
{
public static IRevitTask RevitTask => revitTaskService;
private static RevitTaskService revitTaskService;

public Result Execute(ExternalCommandData commandData, ref string message, ElementSet elementSet)
{

    revitTaskService = new RevitTaskService(commandData.Application);
    revitTaskService.Initialize();
    Execute();

    return Result.Succeeded;
}

private async void Execute()
{
    // replace with your own callback url
    string callBackUrl = "http://localhost:8080/api/auth/callback";
    // replace with your own client id
    string clientId = Environment.GetEnvironmentVariable("CLIENT_ID");
    Globals.ClientId = clientId;
    Globals.CallbackURL = callBackUrl;
    await RevitTask.Run(() =>
    {

        string codeVerifier = RandomString(64);
        string codeChallenge = GenerateCodeChallenge(codeVerifier);
        Globals.codeVerifier = codeVerifier;
        RedirectToLogin(codeChallenge);
        return Task.CompletedTask;
    });
}
// all the rest method will be same with the tutorial above
}Here is the video to show you how to get the token with PKCE for Revit Add-in.
Conclusion
I hope this article has helped you understand how to obtain a 3-legged token and a 3-legged token with PKCE using Csharp. So depend on your application, you can choose the best way to get the token. If you have any questions or feedback, feel free to leave a comment below. Thank you for reading!
Github Resource
Github 3Leg CSharp - https://github.com/chuongmep/aps-toolkit-3leg-csharp
Auth PKCE Csharp - https://github.com/chuongmep/aps-tookit-auth-3leg-pkce
Revit Add-in PKCE - https://github.com/chuongmep/RevitAddin.Auth.Example
Proof Key for Code Exchange by OAuth Public Clients - https://datatracker.ietf.org/doc/html/rfc7636