Introduction
Three-legged authentication is an OAuth 2.0 authentication process that you can use to enable your application to access user resources through Autodesk's API. In this process, users will grant access to their resources through your application without sharing their passwords with your application.
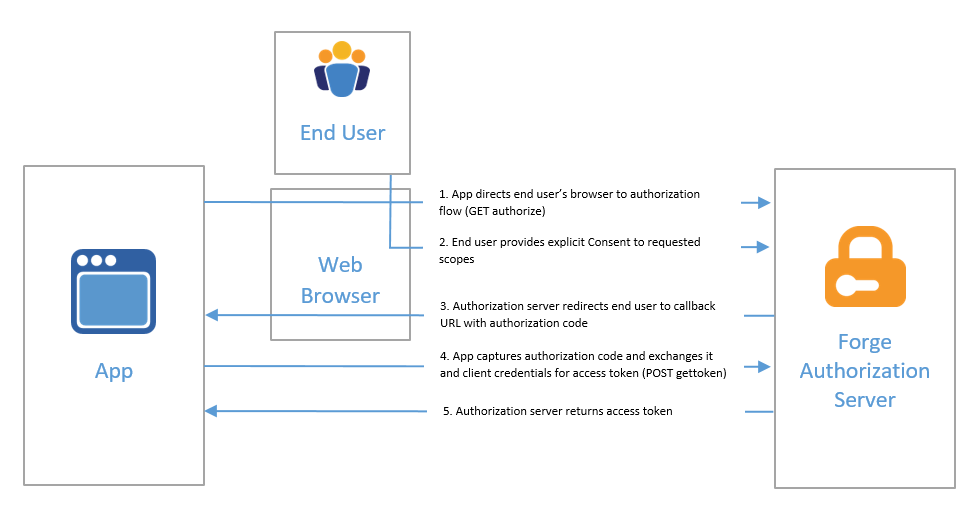
However, this also comes with some drawbacks as it requires multiple steps to obtain a token. In this article, I will guide you on how to obtain a three-legged token using Python. I will simplify it by performing them within a Python script.
This is problem resolved for a user sent me a email update for APS Toolkit a few months ago. I have a plan to update it and release a new version for APS Toolkit together with this article.
How to Get a 3-Legged Token With Python
This code is for implementing OAuth2 authentication flow for Autodesk Forge Platform. Let's break it down step by step:
- Importing Libraries: The code begins by importing necessary libraries such as
urllib.parse,webbrowser,requests,os, and classes fromhttp.server.
import urllib.parse
import webbrowser
import requests
import os
from http.server import HTTPServer, BaseHTTPRequestHandlerhandle_callbackFunction: This function handles the callback received from the authorization server after the user grants permission to access their resources. It sends a POST request to Autodesk's token endpoint (https://developer.api.autodesk.com/authentication/v2/token) with the authorization code received in the callback. Upon successful authentication, it prints the token received.
def handle_callback(client_id, client_secret, callback_url, code):
    tokenUrl = "https://developer.api.autodesk.com/authentication/v2/token"
    payload = {
        "grant_type": "authorization_code",
        "code": code,
        "client_id": client_id,
        "client_secret": client_secret,
        "redirect_uri": callback_url
    }
    resp = requests.post(tokenUrl, data=payload)
    respJson = resp.json()
    print("Authenticated successfully. Token:", respJson)
return respJsonCallbackHandlerClass: This class inherits fromBaseHTTPRequestHandlerand defines a custom HTTP request handler for the callback server. It overrides thedo_GETmethod to parse the query parameters from the callback URL, extract the authorization code, and call thehandle_callbackfunction.
class CallbackHandler(BaseHTTPRequestHandler):
    def do_GET(self):
        query = urllib.parse.urlparse(self.path).query
        params = urllib.parse.parse_qs(query)
        code = params.get('code', [''])[0]
        if code:
            self.send_response(200)
            self.end_headers()
            self.wfile.write(b"Authentication successful. You can close this window now.")
            handle_callback(CLIENT_ID, CLIENT_SECRET, CALLBACK_URL, code)
        else:
            self.send_response(400)
            self.end_headers()
self.wfile.write(b"Bad Request")start_callback_serverFunction: This function starts a callback server on a specified port (default is 8080). It creates an instance ofHTTPServerwith the specified port and theCallbackHandlerclass, then callshandle_requestto listen for incoming requests.
def start_callback_server(port=8080):
    server_address = ('', port)
    httpd = HTTPServer(server_address, CallbackHandler)
    print(f'Starting callback server on port {port}...')
httpd.handle_request()initiate_authenticationFunction: This function constructs the authorization URL for initiating the OAuth2 authentication flow. It opens the constructed URL in the default web browser usingwebbrowser.open. The URL includes parameters such asresponse_type,client_id,redirect_uri, andscope.
def initiate_authentication(client_id, callback_url, scopes):
    auth_url = f"https://developer.api.autodesk.com/authentication/v2/authorize?response_type=code&client_id={client_id}&redirect_uri={callback_url}&scope={scopes}"
webbrowser.open(auth_url)- Usage Section:
In this section, environment variables APS_CLIENT_ID and APS_CLIENT_SECRET are used to retrieve the client ID and client secret for authentication. The callback URL (CALLBACK_URL) is set to http://localhost:8080/api/auth/callback, and the desired scopes (SCOPES) are set to 'data:read viewables:read'.
Then, the authentication flow is initiated using initiate_authentication, followed by starting the callback server using start_callback_server.
Overall, this code sets up a local server to handle the OAuth2 authentication callback from Autodesk Forge Platform, exchanges the authorization code for an access token, and prints the token upon successful authentication. Let's use full code below to get 3-legged token with Python.
import urllib.parse
import webbrowser
import requests
import os
from http.server import HTTPServer, BaseHTTPRequestHandler

def handle_callback(client_id, client_secret, callback_url, code):
    tokenUrl = "https://developer.api.autodesk.com/authentication/v2/token"
    payload = {
        "grant_type": "authorization_code",
        "code": code,
        "client_id": client_id,
        "client_secret": client_secret,
        "redirect_uri": callback_url
    }
    resp = requests.post(tokenUrl, data=payload)
    respJson = resp.json()
    print("Authenticated successfully. Token:", respJson)
    return respJson

class CallbackHandler(BaseHTTPRequestHandler):
    def do_GET(self):
        query = urllib.parse.urlparse(self.path).query
        params = urllib.parse.parse_qs(query)
        code = params.get('code', [''])[0]
        if code:
            self.send_response(200)
            self.end_headers()
            self.wfile.write(b"Authentication successful. You can close this window now.")
            handle_callback(CLIENT_ID, CLIENT_SECRET, CALLBACK_URL, code)
        else:
            self.send_response(400)
            self.end_headers()
            self.wfile.write(b"Bad Request")

def start_callback_server(port=8080):
    server_address = ('', port)
    httpd = HTTPServer(server_address, CallbackHandler)
    print(f'Starting callback server on port {port}...')
    httpd.handle_request()

def initiate_authentication(client_id, callback_url, scopes):
    auth_url = f"https://developer.api.autodesk.com/authentication/v2/authorize?response_type=code&client_id={client_id}&redirect_uri={callback_url}&scope={scopes}"
    webbrowser.open(auth_url)

# Usage
CLIENT_ID = os.environ.get('APS_CLIENT_ID')
CLIENT_SECRET = os.environ.get('APS_CLIENT_SECRET')
CALLBACK_URL = 'http://localhost:8080/api/auth/callback'
SCOPES = 'data:read viewables:read'

initiate_authentication(CLIENT_ID, CALLBACK_URL, SCOPES)
start_callback_server()Look the result :

Use APS Toolkit
I release a toolkit to help you get 3-legged token with Python easily. You can install it by running the following command in case you are using jupyter notebook or colab.
%pip install aps-toolkit --upgradeIn case you are using a local environment, you can install it by running the following command.
pip install aps-toolkit --upgradeAfter installing the toolkit, you can use the following code to get a 3-legged token. When you use this step, need make sure you added callback url to your app in the Forge Developer Portal.
import os
from aps_toolkit import Auth
# set your client id and client secret
os.environ['APS_CLIENT_ID'] = '<Your Client Id>'
os.environ ['APS_CLIENT_SECRET'] = '<Your Client Secret>'
# get your client id and client secret
client_id = os.environ.get('APS_CLIENT_ID')
client_secret = os.environ.get('APS_CLIENT_SECRET')
auth = Auth(client_id, client_secret)
# now is the step to get 3-legged token
# please follow
redirect_uri = "http://localhost:8080/api/auth/callback"
scopes = 'data:read viewables:read'
token = auth.auth3leg(redirect_uri, scopes)In case you running the code workflow in the server, you need use feature fresh token to get new token without open browser in 14 days.
# token is the token from last login success use auth.auth3leg(redirect_uri, scopes)
new_token = auth.refresh_new_token(token.refresh_token)
# new_token.refresh_tokenFlash App
I also saw a Flask app to get 3-legged token with Python :
from flask import Flask, request, redirect
import requests
import os
from dotenv import load_dotenv

app = Flask(__name__)

# Load configuration variables from .env
load_dotenv()

@app.route('/')
def authenticate():
  return redirect(f"https://developer.api.autodesk.com/authentication/v2/authorize?response_type=code&client_id={os.getenv('CLIENT_ID')}&redirect_uri={os.getenv('CALLBACK_URL')}&scope={os.getenv('SCOPES')}")

@app.route('/api/auth/callback', methods=['POST','GET'])
def callback():
  # Get credential code
  code = request.args.get('code')
  payload = f"grant_type=authorization_code&code={code}&client_id={os.getenv('CLIENT_ID')}&client_secret={os.getenv('CLIENT_SECRET')}&redirect_uri={os.getenv('CALLBACK_URL')}"
  tokenUrl = "https://developer.api.autodesk.com/authentication/v2/token"
  headers = {
      "Content-Type": "application/x-www-form-urlencoded"
  }
  resp = requests.request("POST", tokenUrl, data=payload, headers=headers)
  respJson = resp.json()
  # Return success response
  return f"{respJson}", 200

if __name__ == '__main__':
  app.run(debug=True, port=8080)
Many thanks to the author Joao Martins of this code.
Github Resource
APS-Flask-OAuth- https://github.com/chuongmep/aps-flask-oauth
Github 3Leg CSharp - https://github.com/chuongmep/aps-toolkit-3leg-csharp
APS Toolkit - https://github.com/chuongmep/aps-toolkit
Flask APS 3-Legged - https://github.com/JoaoMartins-callmeJohn/aps-3lo-python