Introduction
Welcome to this comprehensive tutorial that will walk you through the step-by-step process of creating a basic IFC.js viewer using Rollup. Furthermore, we will demonstrate how to easily deploy your project on GitHub Pages. To make the most of this tutorial, it is recommended that you first read our earlier article Build A Simple IFC Viewer Use Webpack, which will provide you with valuable context and insights for this tutorial. Let's dive in!
What Is Rollup?
Rollup.js is a JavaScript module bundler that compiles small code modules into larger, more complex applications or libraries. It leverages the ES6 module format, offering a standardized and efficient way to manage your code. Unlike older solutions like CommonJS and AMD, Rollup embraces ES modules, enabling you to easily combine individual functions from various libraries. It provides a forward-looking approach to code bundling, making it accessible today for modern development needs.
Depend on your project, you can choose the bundler that you want to use, but in this tutorial, I will use Rollup to build a simple IFC viewer.
Transitioning from Webpack to Rollup
If you've already followed our initial guide using Webpack, you likely have a grasp of the IFC.js setup in that context, including the configuration of your development environment. Transitioning to Rollup is a straightforward process that simplifies your workflow with IFC.js.
Here's a step-by-step guide to make the transition:
Start by visiting the ifc-rollup repository on GitHub.
Click on the "Use this template" button to create your repository, based on the provided template.
This repository will serve as the foundation for your IFC.js project with Rollup, making it easier to migrate from your existing Webpack setup.
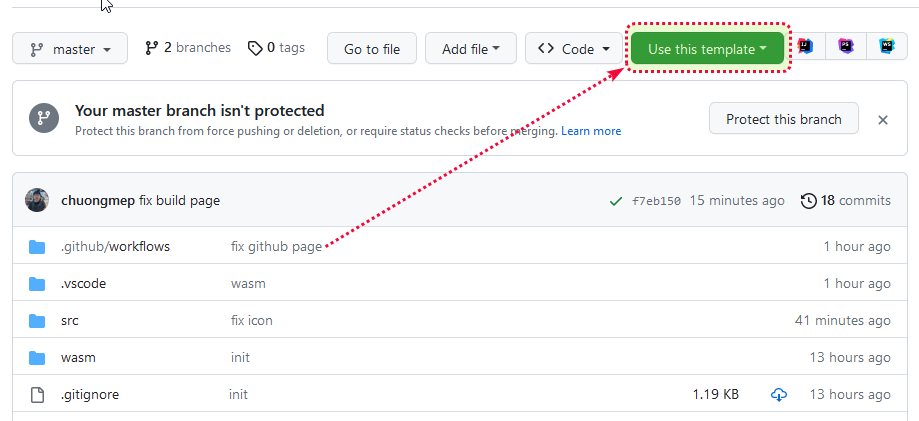
- Let's name your repo, and click create repository from template:
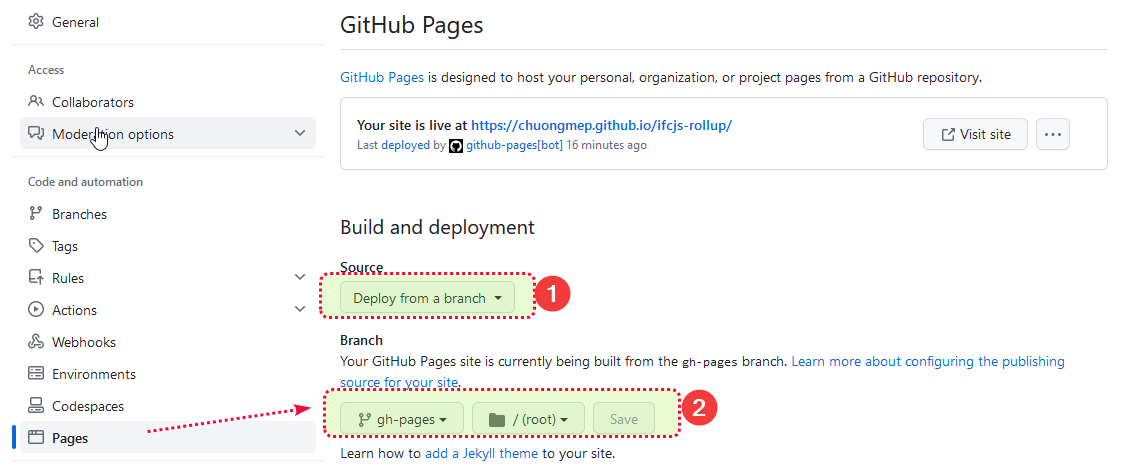
After that, you can deploy to github page by setting in your repo:
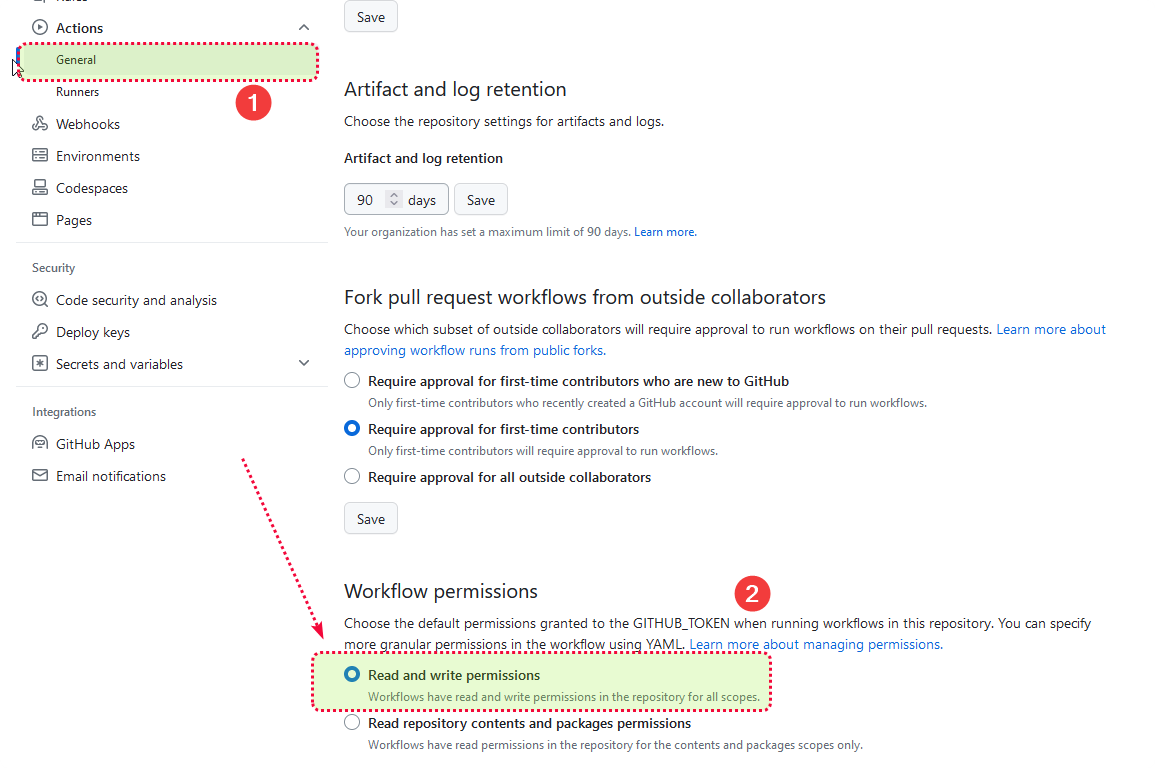
- Just one more step, let't allow github action have permission read and write to your repo:
- Now, return to your project and navigate to the "Actions" tab. You'll notice that your action is currently running. Once the action completes, you can view the details by following a link like this one: Example Action..
With your GitHub Action successfully executed, your project is now ready to use. You can access your project's GitHub Pages by visiting my URL example: https://chuongmep.github.io/ifcjs-rollup/.
Tada, you have a simple IFC viewer with rollup, you can try download ifc file and load it to your viewer at Sample-Test-Files
Let's back to repo ifcjs-webpack , you can do the same thing with this repo, just follow the step above.
Note
It's important to note that the entire process, including cloning, installation, building, deployment, and more, remains consistent with the tutorial "Building a Simple IFC Viewer with Webpack." You can seamlessly continue following this tutorial to ensure a smooth transition.
Understanding the Rollup Configuration
Let's take a closer look at the Rollup configuration file, which is located in the root directory of your project. The file is named rollup.config.js and contains the following code:
In this file, we import the resolve plugin, which allows us to import third-party modules from node_modules. We also import the css plugin, which allows us to import CSS files. Finally, we import the html plugin, which allows us to import HTML files. I Also added some commdents to help you understand more about process of serve and livereload, you can uncomment it if you want to use it.
dist meaning is distribution, it is the folder that contains the final files that will be deployed to GitHub Pages.
import resolve from '@rollup/plugin-node-resolve';
import css from'rollup-plugin-css-only'
import html from 'rollup-plugin-html';
import copy from 'rollup-plugin-copy';
// import serve from 'rollup-plugin-serve';
// import livereload from 'rollup-plugin-livereload';
export default {
  input: './src/index.js',
  output: [
    {
      format: 'esm',
      file: './dist/bundle.js',
      inlineDynamicImports: true
    },
  ],
  plugins: [
    resolve(),
    css({ output: 'dist/bundle.css' }),
    html({
      include: '**/*.html',
      htmlMinifierOptions: {
        collapseWhitespace: true,
        collapseBooleanAttributes: true,
        conservativeCollapse: true,
        minifyCSS: true,
        minifyJS: true,
      }
    }),
    copy({
      targets: [
        {src: 'src/icon.png', dest: 'dist'},
        { src: 'src/*.html', dest: 'dist' }, // Copy all HTML files from src to dist
        { src: './wasm', dest: 'dist' }, // Copy the entire 'wasm' folder
      ],
    }),
    // serve({
    //   open: true,
    //   contentBase: 'dist',
    //   port: 3000, // Choose the port you prefer
    // }),
    // livereload('dist'),
  ]
};This file is the entry point of your application. It imports the CSS file and the HTML file, and it also imports the IFCLoader from web-ifc-three. Finally, it sets up the IFC loading and renders the scene.
import './style.css'
import {
    AmbientLight,
    AxesHelper,
    DirectionalLight,
    GridHelper,
    PerspectiveCamera,
    Scene,
    WebGLRenderer,
  } from "three";
  import {
      OrbitControls
  } from "three/examples/jsm/controls/OrbitControls";

  //Creates the Three.js scene
  const scene = new Scene();

  //Object to store the size of the viewport
  const size = {
    width: window.innerWidth,
    height: window.innerHeight,
  };

  //Creates the camera (point of view of the user)
  const aspect = size.width / size.height;
  const camera = new PerspectiveCamera(75, aspect);
  camera.position.z = 15;
  camera.position.y = 13;
  camera.position.x = 8;

  //Creates the lights of the scene
  const lightColor = 0xffffff;

  const ambientLight = new AmbientLight(lightColor, 0.5);
  scene.add(ambientLight);

  const directionalLight = new DirectionalLight(lightColor, 1);
  directionalLight.position.set(0, 10, 0);
  directionalLight.target.position.set(-5, 0, 0);
  scene.add(directionalLight);
  scene.add(directionalLight.target);

  //Sets up the renderer, fetching the canvas of the HTML
  const threeCanvas = document.getElementById("three-canvas");
  const renderer = new WebGLRenderer({
      canvas: threeCanvas,
      alpha: true
  });

  renderer.setSize(size.width, size.height);
  renderer.setPixelRatio(Math.min(window.devicePixelRatio, 2));

  //Creates grids and axes in the scene
  const grid = new GridHelper(50, 30);
  scene.add(grid);

  const axes = new AxesHelper();
  axes.material.depthTest = false;
  axes.renderOrder = 1;
  scene.add(axes);

  //Creates the orbit controls (to navigate the scene)
  const controls = new OrbitControls(camera, threeCanvas);
  controls.enableDamping = true;
  controls.target.set(-2, 0, 0);

  //Animation loop
  const animate = () => {
    controls.update();
    renderer.render(scene, camera);
    requestAnimationFrame(animate);
  };

  animate();

  //Adjust the viewport to the size of the browser
  window.addEventListener("resize", () => {
    size.width = window.innerWidth;
    size.height = window.innerHeight;
    camera.aspect = size.width / size.height;
    camera.updateProjectionMatrix();
    renderer.setSize(size.width, size.height);
  });

  import { IFCLoader } from "web-ifc-three/IFCLoader";

  // Sets up the IFC loading
  const ifcLoader = new IFCLoader();
  ifcLoader.ifcManager.setWasmPath("wasm/");
  const input = document.getElementById("file-input");
  input.addEventListener(
    "change",
    (changed) => {
      const file = changed.target.files[0];
      var ifcURL = URL.createObjectURL(file);
      ifcLoader.load(
            ifcURL,
            (ifcModel) => {
              scene.add(ifcModel);
              console.log(ifcModel)

            });
    },
    false
);This file is the HTML template of your application. It contains the canvas and the input file, you can see at line 15-18, it is browser file input, you can use it to load your ifc file.
<!DOCTYPE html>
<html lang="en">
  <head>
    <meta charset="UTF-8" />
    <meta http-equiv="X-UA-Compatible" content="IE=edge" />
    <meta name="viewport" content="width=device-width, initial-scale=1.0" />
    <link rel="shortcut icon" type="image/png" href="icon.png">
    <link rel="stylesheet" href="./bundle.css" />
    <title>IFC.js web viewer</title>
  </head>
  <body>
    <div class="header">
      <h1>Hello IFC.js</h1>
    </div>
    <div class="input">
      <input type="file" name="load" id="file-input" />
    </div>
    <div class="canvas">
      <canvas id="three-canvas"></canvas>
    </div>
    <script src="./bundle.js"></script>
  </body>
</html>Folder wasm : This folder contains the WebAssembly files that are used by IFC.js. You can learn more about WebAssembly here.
With another file, you can quick look to repo ifcjs-rollup and explore more.
Conclusion
I trust that this tutorial has provided you with a clear understanding of using IFC.js with Rollup. If you have any questions, feedback, or comments, please don't hesitate to share them below. I'm here to assist and address any inquiries you may have. Thank you for joining us on this journey!
Additional Resource
I think now you can explore cli with repo : https://github.com/ENG-Mazri/cli-ifcjs, it must be easier for you to use IFC.js with cli. And also, you can explore more about IFC.js with some repo:
Open Source
- [https://ollama.ai] - Ollama.ai is a ai platform, allow you can running with large model, locally.
- [https://martendb.io] - Marten is a .NET library for building applications using document-based approach and Event Sourcing. We're committed to removing boilerplate work and letting you focus on delivering business value.