Introduction
Let's go back to 2019, a time when I was very excited about Autodesk Forge, a service that provided easy access to rich data originating from various software applications like Autocad, Revit, and Naviswork. Today, we are rekindling that excitement with a new name Autodesk Platform Services(APS). Additionally, I will guide you on how to conquer and explore them more easily. Together, we will delve into the limits of this platform.
I had a previous introductory article discussing Autodesk Platform Services, which you can revisit Autodesk Platform Services. The challenges in accessing this platform have been the driving force behind my decision to write an extensive series, making it more accessible to help developer and some people want know more about this platform easily access and understand the platform. I will also share my experiences and knowledge learning together with you.
What to Learn First?
Programming Language
The first thing you need to learn is a programming language. You can choose from options like C#, Python, JavaScript, Node.js, etc. Among these, I would recommend considering either C# or JavaScript. Here are some of my personal insights on a few programming languages for your reference:
Python: Python is an easy-to-learn language but can be challenging to scale for enterprise projects. Especially with services like Forge, there are not many widely-used libraries available for it. You can check out the unofficial Forge SDK for Python at https://github.com/chuongmep/forge-sdk-python. If you are interested in deep data analysis, this language might be worth exploring. I use it mainly for data analysis, machine learning, artificial intelligence, and some small scripts within Dynamo Revit.
C#: C# is an easy-to-learn, easy-to-scale language, well-documented, and suitable for working with Forge services. If you are a .NET developer, this is a good choice for you. I still consider .NET a powerful language with high enterprise mobility. It's a language I love to work with for most API development tasks involving software like Revit, Autocad, Naviswork, and more.
JavaScript: JavaScript is easy to learn, comes with many examples when used with Node.js, and offers various useful libraries for working with Forge services. If you are a web developer, this is a good choice. A helpful tip when learning this language is not to rush into frameworks like React, Angular, Vue, etc. Focus on JavaScript first before diving into these frameworks. Concentrate on concepts like syntax, control structures, functions, variables, arrays, strings, objects, classes, and how to work with HTML and CSS. Don't let frameworks confuse you with the basic concepts of JavaScript.
TypeScript: TypeScript was created to address the weaknesses of JavaScript and can be considered an upgraded version of JavaScript. However, if you are not familiar with or haven't worked with JavaScript, it's best to learn JavaScript before diving into TypeScript.
In general, each language has its own strengths and weaknesses. It's important to choose a language that you feel comfortable with because the language is just a tool; the rest depends on your logic and creativity.
Think Like a Developer
The next thing you need to learn is how to think like a developer. This is a skill that will help you solve problems more efficiently. Here are some tips to help you think like a developer:
Learn to read documentation: This is a skill that will help you understand the concepts and features of a service. It will also help you understand how to use the service and its limitations. You can find documentation for Forge at https://aps.autodesk.com/developer/documentation.
Learn to read source code: This is a skill that will help you understand how a service works. It will also help you understand how to use the service and its limitations. You can find source code for Forge at https://github.com/autodesk-platform-services
Learn to read error messages: This is a skill that will help you understand what went wrong when something doesn't work as expected. It will also help you understand how to fix the problem.
Learn to use Google: This is a skill that will help you find answers to your questions. It will also help you understand how to solve problems more efficiently.
Learn to use Stack Overflow: This is a skill that will help you find answers to your questions. It will also help you understand how to solve problems more efficiently.
Learn to use GitHub: This is a skill that will help you find answers to your questions. It will also help you understand how to solve problems more efficiently.
Think Like A Engineering
Yes, you need to learn engineering. This is a skill that will help you understand how to solve problems more efficiently. Here are some tips to help you think like an engineer:
Learn to use Autodesk software: This will useful for your to understand why engineers need to use Autodesk software. It will also help you have a better before resolve apply any challenge with Autodesk Platform Services.
Learn to use BIM 360: This will useful for your to understand why engineers need to use BIM 360, ACC, and more. It will also help you understand what is BIM 360 and how to use it, and then why we need to use BIM 360 with Autodesk Platform Services.
Understanding BIM Data and Related Parameters: That's right, if you're a programmer stepping into the field of construction data and working with building models, it can indeed be quite challenging. You should approach it like an engineer to gain a deep understanding of project drawings, attributes, characteristics of each project, and the data within it. This will help you grasp more about the data and how it operates.
Basic Concepts
API(Application Programming Interface)
API, which stands for Application Programming Interface, is a fundamental concept in the world of software development. An API serves as a bridge that allows different software systems to communicate, interact, and share data and functionalities seamlessly. It defines the rules, protocols, and tools that applications can use to request and exchange information with one another. API is a set of functions and procedures that allow the creation of applications that access the features or data of an operating system, application, or other service. With understanding API, you can easily understand the concept of Rest API.
Rest API
A REST API is a type of software architecture that allows applications to communicate with each other through simple HTTP protocols. REST APIs are widely used in web applications, mobile applications, IoT applications, and more.
Token
Tokens are often associated with secret key strings used for user authentication. Tokens can be used to access resources, interact with APIs, and more. This ensures that users don't have to re-enter their username and password every time they access a specific resource. Tokens can be stored in cookies or on the server. Here are some basic examples of tokens:
- Access Token: Used to authenticate users and access specific resources.
- Refresh Token: Used to obtain a new Access Token when it expires.
- ID Token: Used for user authentication and accessing specific resources.
- Token Type: The type of token, for example: Bearer, Basic, etc.
Authentication with an API is straightforward, for example:
https://developer.api.autodesk.com/authentication/v1/authenticate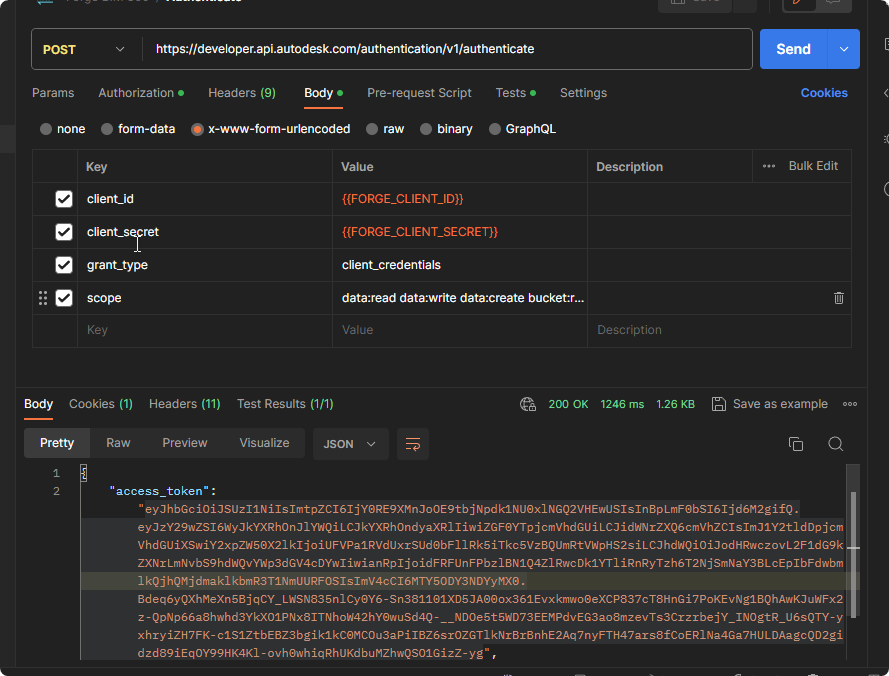
Additionally, if you are familiar with the Python programming language, retrieving an authentication code is quite simple with the autodesk_forge_sdk library. Make sure you have set up authentication with Forge and have the information for FORGE_CLIENT_ID and FORGE_CLIENT_SECRET, both of which should be placed in your computer's environment variables.
import os
from autodesk_forge_sdk import AuthenticationClient, Scope
client = AuthenticationClient()
auth = client.authenticate(os.environ["FORGE_CLIENT_ID"],os.environ["FORGE_CLIENT_SECRET"], [Scope.VIEWABLES_READ])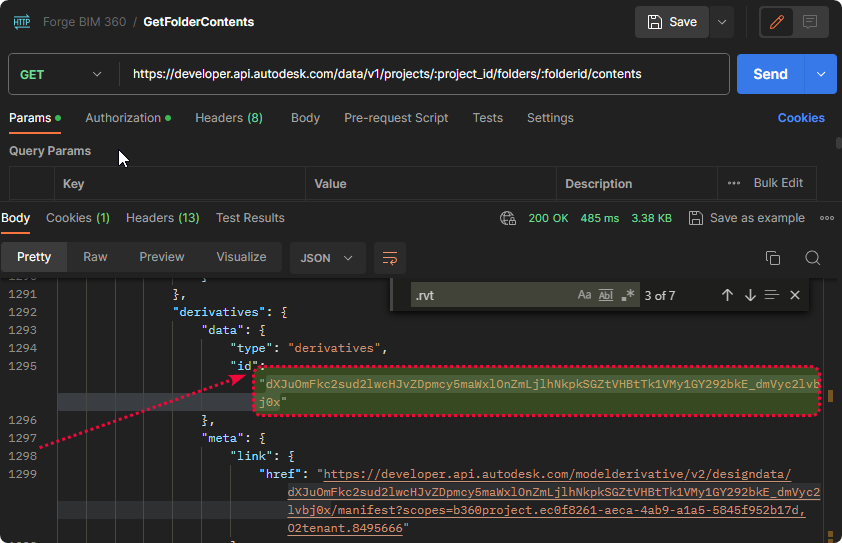
print(auth["access_token"])URN (Uniform Resource Name)
A URN is a unique identifier used to specify a specific resource. URNs can be used to identify a document, a file, an image, a user, and more. Here are some basic examples of URNs within Forge:
Displaying a Basic 3D Model
You can quickly access https://forge-viewer.chuongmep.com/ to view a basic 3D model. This is the simplest example to help you understand how the Forge Viewer works. Let's go through some explanations before you get started.
<link rel="stylesheet" href="https://developer.api.autodesk.com/modelderivative/v2/viewers/7.*/style.min.css" type="text/css">
<script src="https://developer.api.autodesk.com/modelderivative/v2/viewers/7.*/viewer3D.min.js"></script>Here's an explanation for the code snippet above:
link: This is an HTML element used to link to a CSS file. In this code, rel is the attribute specifying the link type (stylesheet), and href is the attribute specifying the URL to the CSS file. This CSS file is fetched from Autodesk Forge Viewer.
script: This is an HTML element used to embed JavaScript code into your webpage. In this code, src is the attribute specifying the URL to the JavaScript file. This JavaScript file is also fetched from Autodesk Forge Viewer. Essentially, this file is hosted on Autodesk's server and provided to you for use.
 <style>
        body {
            margin: 10px;
        }

        #forgeViewer {
            width: 90%;
            height: 100%;
            margin: 0;
            background-color: #F0F8FF;
        }
</style>Here's an explanation for the code snippet above:
body: This is a CSS selector targeting the body element, which is the root element of the webpage. This code sets properties for the body element, including: margin: 10px;: Setting a margin of 10 pixels around the outside of the body element, creating an outer margin for the webpage for aesthetics and content centering.
#forgeViewer: This is a CSS selector targeting an element with the id "forgeViewer". This code sets properties for the element with the id "forgeViewer," assuming that you have an HTML element with the id "forgeViewer" to apply the following rules to:
- width: 90%;: Setting the width of the "forgeViewer" element to 90% of its parent's width. This means it will occupy 90% of its parent's width.
- height: 100%;: Setting the height of the "forgeViewer" element to 100% of its parent's height. This makes the "forgeViewer" element have the same height as its parent.
- margin: 0;: Removing any margin around the "forgeViewer" element, as we already set an outer margin on the body element in the previous section, so there's no need for additional margin.
- background-color: #F0F8FF;: Setting the background color of the "forgeViewer" element to light blue (#F0F8FF).
In summary, this CSS code configures the webpage to have a 10px outer margin and a "forgeViewer" element with a width of 90% of its parent, a height equal to its parent, and a light blue background color.
Now, you can see overall example code how to use auth-token and urn to display a basic 3D model in the Viewer sample.
<!DOCTYPE html>
<html lang="en">

<head>
    <meta name="viewport" content="width=device-width, minimum-scale=1.0, initial-scale=1, user-scalable=no" />
    <meta charset="utf-8">
    <!-- Autodesk Viewer files -->
    <link rel="stylesheet" href="https://developer.api.autodesk.com/modelderivative/v2/viewers/7.*/style.min.css" type="text/css">
    <script src="https://developer.api.autodesk.com/modelderivative/v2/viewers/7.*/viewer3D.min.js"></script>
    <!--Styling to make the page look presentable-->
    <style>
        body {
            margin: 10px;
        }

        #forgeViewer {
            width: 90%;
            height: 100%;
            margin: 0;
            background-color: #F0F8FF;
        }
    </style>
</head>

<body bgcolor="#d3d3d3">
<h1>Display an SVF2 Derivative in the Viewer</h1>
<!-- Capture Access Token and URN of the Source file corresponding to the SVF2 file to display-->
<form id="frm1">
    Access Token:
    <br>
    <textarea id="access_token" rows="6" cols="100">Copy-paste your access token here.</textarea>
    <br>
    <br> Source File URN (encoded):
    <br>
    <textarea id="source_file_urn" rows="2" cols="100">Copy-paste the URL safe Base64-encoded URN of the source file here.</textarea>
    <br>
    <br>
    <input type="button" onclick="DisplayViewer()" value="Submit">
    <br>
    <br>
</form>
<div id="viewables_dropdown" style="display:none">
    <!-- This drop-down is not visible until there is more than one viewable to display-->
    <br>
    <br>
    <label for="viewables">Choose a viewable:</label>
    <select id="viewables" onchange="selectViewable()"></select>
    <br>
    <br>
</div>
<!-- This is where the Viewer will be displayed-->
<div id="forgeViewer"></div>

<script>
    var viewer;
    var md_ViewerDocument;
    var md_viewables;

    var inputs = document.querySelectorAll('input');

    function DisplayViewer() {

        var options = {
            env: 'AutodeskProduction2',
            api: 'streamingV2', // for models uploadeded to EMEA change this option to 'streamingV2_EU'
            getAccessToken: function(onTokenReady) {
                var x = document.getElementById("access_token")
                var token = x.value;
                var timeInSeconds = 3600; // Use value provided by Authentication (OAuth) API
                onTokenReady(token, timeInSeconds);
            }
        }

        <!-- This is called when the page is loaded-->
        Autodesk.Viewing.Initializer(options, function() {

            var htmlDiv = document.getElementById('forgeViewer');
            viewer = new Autodesk.Viewing.GuiViewer3D(htmlDiv);
            var startedCode = viewer.start();

            if (startedCode > 0) {
                console.error('Failed to create a Viewer: WebGL not supported.');
                return;
            }

            console.log('Initialization complete, loading a model next...');

        });

        var x = document.getElementById("source_file_urn")
        var documentId = 'urn:' + x.value; // Add the string 'urn:' to the actual URN value
        Autodesk.Viewing.Document.load(documentId, onDocumentLoadSuccess, onDocumentLoadFailure);


    };

    <!--This is called when an option is selected from the Choose viewables drop-down -->
    function selectViewable() {

        var indexViewable = document.getElementById("viewables").selectedIndex;
        // Load another viewable from selectedIndex of drop-down.
        viewer.loadDocumentNode(md_ViewerDocument, md_viewables[indexViewable]);
    }

    function onDocumentLoadSuccess(viewerDocument) {

        var viewerapp = viewerDocument.getRoot();

        md_ViewerDocument=viewerDocument; // Hold the viewerDocument in a global variable so that we can access it within SelectViewable()
        md_viewables = viewerapp.search({'type':'geometry'});

        if (md_viewables.length === 0) {
            console.error('Document contains no viewables.');
            return;
        }

        // populate the Choose viewables drop down with the viewable name
        var sel = document.getElementById('viewables');
        for(var i = 0; i < md_viewables.length; i++) {
            var opt = document.createElement('option');
            opt.innerHTML = md_viewables[i].data.name;
            opt.value =  md_viewables[i].data.name;

            sel.appendChild(opt);
        }

        viewer.loadDocumentNode(viewerDocument, md_viewables[0]);

        <!-- Make the Choose viewable drop-down visible, if and only if only there are more than one viewables to display-->


        if (md_viewables.length > 1) {
            var viewablesDIV= document.getElementById("viewables_dropdown");
            viewablesDIV.style.display = "block";

        }

    }

    function onDocumentLoadFailure() {
        console.error('Failed fetching manifest');
    }
</script>

</body>

</html>Now you can quickly authenticate your urn and Auth token to view a basic Forge Viewer. You can access it at https://forge-viewer.chuongmep.com/ or from the official source code at display_svf2 to try it out.
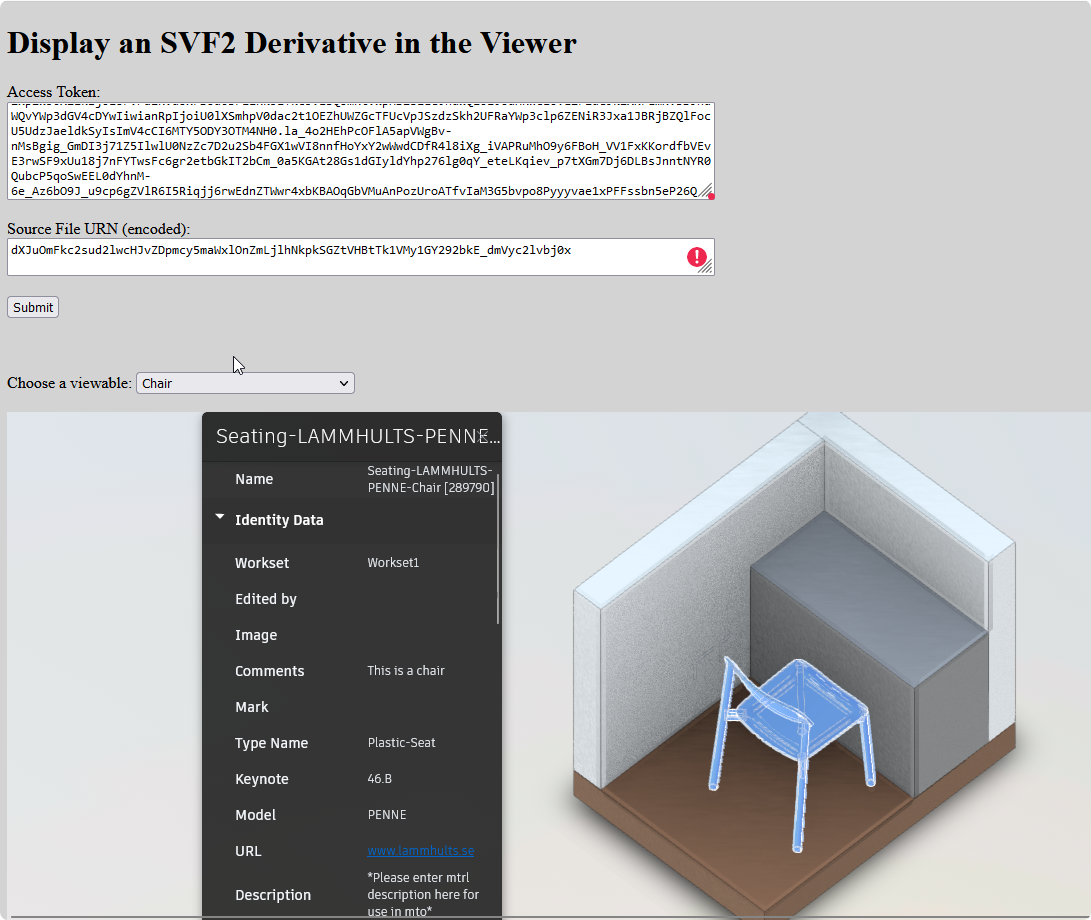
And this is for any people can't do it just want to see the result.
Conclusion
In this article, I have introduced you to the basic concepts of Forge, including API, Rest API, Token, and URN. I have also provided you with a basic example of how to display a 3D model in the Viewer. I hope this article has helped you understand the basics of Forge and how to use it. In the next article, I will introduce you to the concept of BIM360 and how to use it. Thank you for reading, and I hope to see you again in the next article.