Bắt đầu
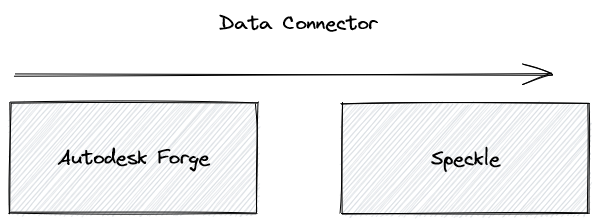
Lấy cảm hứng từ một câu hỏi của người bạn hỏi về cách kết nối dữ liệu giữa Forge API với Speckle, bài viết này sẽ giúp chúng ta có cái nhìn cụ thể vê kết nối giữa 2 nền tảng này.
Tại thời điểm viết bài, dịch vụ nền tảng Autodesk Forge đã được đổi tên sang Autodesk Platform Services điều này đồng nghĩa với việc sẽ có nhiều dịch vụ phổ biến dựa trên đám mây hơn.
Vậy hãy cùng mình khám phá sự kết nối giữa hai nền tảng lưu trữ dữ liệu được xem là sáng giá trong ngành AEC này ở thời điểm hiện tại.
Tạo tài khoản Forge API
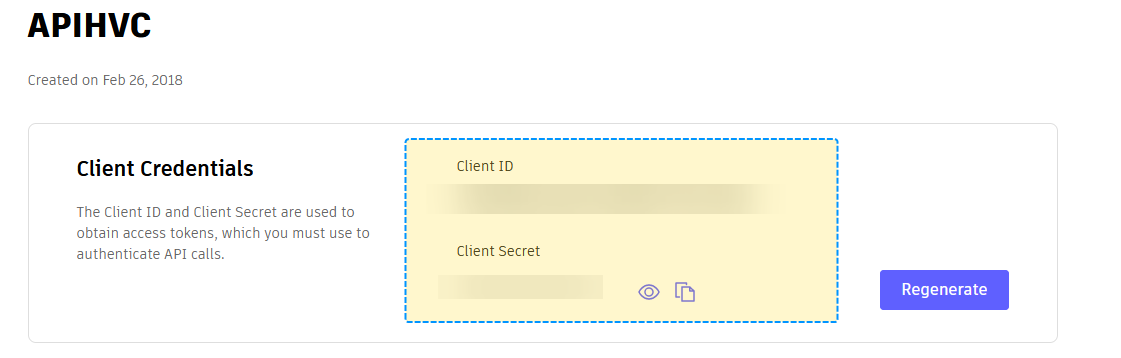
Xác thực Forge API tương đối dễ dàng, bạn chỉ cần tạo và đăng nhập vào tài khoản Forge của mình và tạo ra một ứng dụng đi kèm với. Với việc hướng dẫn tạo đã rất chi tiết ở Create an App Authentication (OAuth) nên mình sẽ không hướng dẫn lại nữa.
Kết nối với BIM 360 Admin
Việc kết nối với BIM 360 giúp bạn dễ dàng lấy được thông tin mô hình lưu trữ từ BIM 360, tuy nhiên một điều lưu ý là để làm được điều này, tài khoản của bạn cần được cấp quyền truy cập vào BIM 360 Admin.
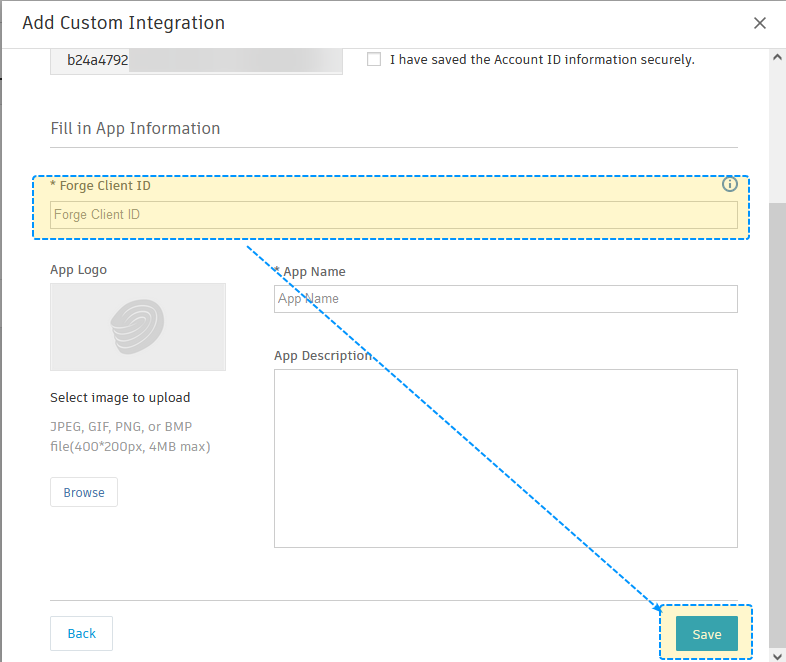
Bạn chọn vào Add Custom Intergration để tạo cho mình một trình với Forge API. Điều này sẽ giúp bạn liên kết giữa Forge API và BIM 360 Admin.

Các bước đầu bạn thiết lập chọn quyền truy cập đầy đủ, tôi là developer, rồi điền thông tin Forge Client ID từ ứng dụng trang Forge mà bạn đã tạo. Sau khi tạo xong, nếu Intergration của bạn được tạo thành công, bạn sẽ thấy biểu tượng nhỏ màu xanh hiện Active trên góc phải của Intergration. Tài liệu Autodesk hướng dẫn khá rõ ràng nên mình cũng không cần viết lại chi tiết làm gì, bạn có thể xem các bước chi tiết tại Manage API Access to BIM 360 Services
Xác thực Forge Và lấy Dữ liệu từ BIM 360
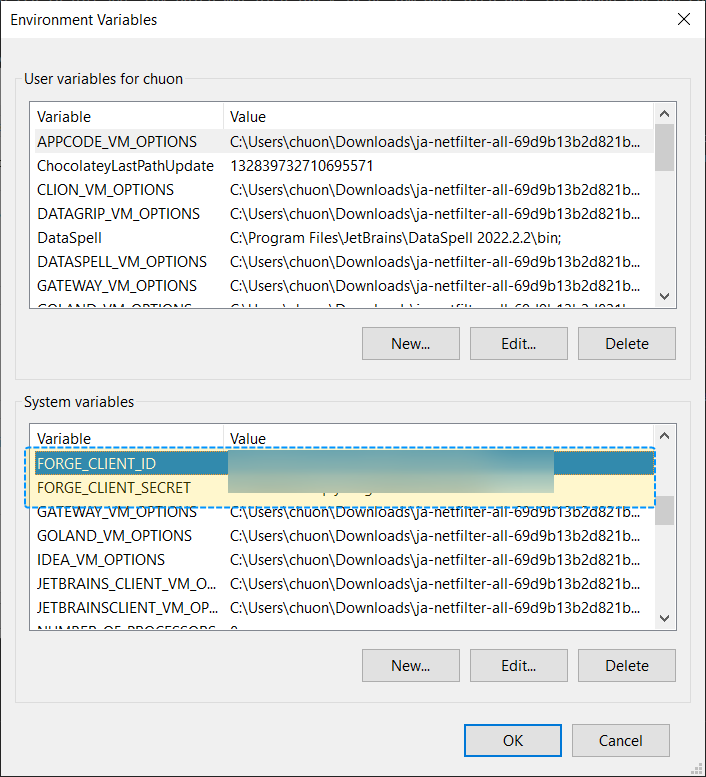
Việc đầu tiên với xác thực là bạn cần tạo biến môi trường cho xác thực trên local của máy, việc này giúp che dấu thông tin Forge Client ID và Client Secret của bạn. Bạn có thể tạo biến môi trường bằng cách mở Command Prompt và gõ lệnh sau, tài liệu chi tiết bạn có thể xem tại setx :
setx FORGE_CLIENT_ID <your_client_id>
setx FORGE_CLIENT_SECRET <your_client_secret>
Hoặc bạn có thể tự tạo bằng tay rồi thêm vào biến môi trường của Windows.
Ở đây mình sẽ sử dụng Forge SDK Python làm ví dụ bởi vì bạn có thể hiểu các hoạt động của xác thực một cách dễ dàng.
Đầu tiên bạn cần lấy về Forge Client Id và Forge Client Secret đã tạo bên trong môi trường
import os
FORGE_CLIENT_ID = os.environ["FORGE_CLIENT_ID"]
FORGE_CLIENT_SECRET= os.environ["FORGE_CLIENT_SECRET"]Sau đó cài đặt package Forge Python API pip install autodesk_forge_sdk
Lấy về xác tất cả các hubs tồn tại bên trong BIM360
import os
from autodesk_forge_sdk import AuthenticationClient, Scope, DataManagementClient,OAuthTokenProvider
client  = DataManagementClient(OAuthTokenProvider(FORGE_CLIENT_ID, FORGE_CLIENT_SECRET))
hubs = client.get_all_hubs()
hubsKết quả đầu ra sẽ là một danh sách các hubs tồn tại bên trong BIM360, do tài khoản mình chỉ có một dự án nên chỉ có một hub duy nhất.
[{'type': 'hubs',
  'id': 'b.b24a4792-e097-4f91-9cc1-3af2c21e4b5c',
  'attributes': {'name': 'chuongmep',
   'extension': {'type': 'hubs:autodesk.bim360:Account',
    'version': '1.0',
    'schema': {'href': 'https://developer.api.autodesk.com/schema/v1/versions/hubs:autodesk.bim360:Account-1.0'},
    'data': {}},
   'region': 'US'},
  'links': {'self': {'href': 'https://developer.api.autodesk.com/project/v1/hubs/b.b24a4792-e097-4f91-9cc1-3af2c21e57cb'}},
'relationships': {'projects': {'links': {'related': {'href': 'https://developer.api.autodesk.com/project/v1/hubs/b.b24a4792-e097-4f91-9cc1-3af2c21e57cb/projects'}}}}}]Lấy về thông tin dự án trong hub.
##https://petrbroz.github.io/forge-sdk-python/dm.html#autodesk_forge_sdk.dm.DataManagementClient.get_all_projects
hubidb = hubs[0]["id"]
projests = client.get_projects(hubidb)
print(projests["data"])Kết quả đầu ra :
{'type': 'projects',
  'id': 'b.ad33088f-5e47-48aa-956d-836a1b055580',
  'attributes': {'name': 'Sample Project - Seaport Civic Center',
   'scopes': ['b360project.ad33088f-5e47-48aa-956d-836a1b055580',
    'O2tenant.32914228'],
   'extension': {'type': 'projects:autodesk.bim360:Project',
    'version': '1.0',
    'schema': {'href': 'https://developer.api.autodesk.com/schema/v1/versions/projects:autodesk.bim360:Project-1.0'},
    'data': {'projectType': 'ACC'}}},
  'links': {'self': {'href': 'https://developer.api.autodesk.com/project/v1/hubs/b.b24a4792-e097-4f91-9cc1-3af2c21e57cb/projects/b.ad33088f-5e47-48aa-956d-836a1b055580'},
   'webView': {'href': 'https://acc.autodesk.com/docs/files/projects/ad33088f-5e47-48aa-956d-836a1b055580'}},
  'relationships': {'hub': {'data': {'type': 'hubs',
     'id': 'b.b24a4792-e097-4f91-9cc1-3af2c21e57cb'},
    'links': {'related': {'href': 'https://developer.api.autodesk.com/project/v1/hubs/b.b24a4792-e097-4f91-9cc1-3af2c21e57cb'}}},
   'rootFolder': {'data': {'type': 'folders',
     'id': 'urn:adsk.wipprod:fs.folder:co.4hsS5TXQR_-3xumyuHZPMg'},
    'meta': {'link': {'href': 'https://developer.api.autodesk.com/data/v1/projects/b.ad33088f-5e47-48aa-956d-836a1b055580/folders/urn:adsk.wipprod:fs.folder:co.4hsS5TXQR_-3xumyuHZPMg'}}},
   'topFolders': {'links': {'related': {'href': 'https://developer.api.autodesk.com/project/v1/hubs/b.b24a4792-e097-4f91-9cc1-3af2c21e57cb/projects/b.ad33088f-5e47-48aa-956d-836a1b055580/topFolders'}}},
   'issues': {'data': {'type': 'issueContainerId',
     'id': 'ad33088f-5e47-48aa-956d-836a1b055580'},
    'meta': {'link': {'href': 'https://developer.api.autodesk.com/issues/v1/containers/ad33088f-5e47-48aa-956d-836a1b055580/issues'}}},
   'submittals': {'data': {'type': 'submittalContainerId',
     'id': 'ad33088f-5e47-48aa-956d-836a1b055580'},
    'meta': {'link': {'href': 'https://developer.api.autodesk.com/submittals/v1/containers/ad33088f-5e47-48aa-956d-836a1b055580/items'}}},
   'rfis': {'data': {'type': 'rfisContainerId',
'id': 'ad33088f-5e47-48aa-956d-836a1b055580'},Xem tổng thể tất cả dự án trong hub. Ở đây mình sử dụng thư viện pandas để xem chi tiết thông tin tên và id của dự án qua dataframe cho dễ hình dung.
import pandas as pd
# dictionary to dataframe
pd.DataFrame(projests["data"])
Tới đây đủ để trình bày cho các bạn cách lấy dữ liệu từ forge rồi, vậy giờ làm sao để kết nối và mang dữ liệu vào Speckle
Xác thực Speckle
Ở bài Use Speckle To Visualization Room Data mình cũng đã trình bày đầy đủ cho các bạn các để xác thực với Speckle rồi, nên ở dây sẽ đi vào chi tiết hơn với từng xác thực và lựa chọn một xác thực dễ dàng nhất.
Có ba kiểu để bạn xác thực một ứng dụng khách dễ dàng nhất với Speckle là sử dụng xác thực qua tài khoản mặc định, xác thực thông qua token và xác thực thông qua wrapper một stream với tài khoản cục bộ.
Đối với kiểu xác thực tài khoản. Trường hợp này xác thực tốt hơn nếu bạn tạo ra một máy chủ riêng.
from specklepy.api.client import SpeckleClient
from specklepy.api.credentials import get_default_account

# initialise the client
client = SpeckleClient(host="your-server.com") # or whatever your host is
# client = SpeckleClient(host="localhost:3000", use_ssl=False) or use local server

# authenticate the client with a token
account = get_default_account()
client.authenticate_with_account(account)Kiểu thứ hai chậm hơn nhưng đảm bảo làm việc được với mã trên Google Colab tách biệt với máy tính cá nhân của bạn, sử dụng một trình xác thực với token với quyền được thiết lập trước.
from specklepy.api.wrapper import StreamWrapper
url = "https://speckle.xyz/streams/0cc1692ab7/commits/7617918499"
wrapper = StreamWrapper(url)
client = client = SpeckleClient(host="speckle.xyz")
client.authenticate_with_token("bfb80533abfe5d6f48fe845fb53cdc9b1c1c402ccf")Và kiểu thứ ba nhanh hơn được lựa chọn cho bài này là xác thực thông qua wrapper một stream với tài khoản cục bộ.
from specklepy.api.wrapper import StreamWrapper
streamid = "0cc1692ab7"
commitid = "7617918499"
url = "https://speckle.xyz/streams/0cc1692ab7/commits/7617918499"
# provide any stream, branch, commit, object, or globals url
wrapper = StreamWrapper(url)

# get an authenticated SpeckleClient if you have a local account for the server
client = wrapper.get_client()
print(client)
# get an authenticated ServerTransport if you have a local account for the server
transport = wrapper.get_transport()Kết quả : SpeckleClient( server: https://speckle.xyz, authenticated: True )
Như vậy là xác thực với Specke đã xong, quá là nhanh chóng.
Kết nối Forge API với Speckle
Việc kết nối với Speckle bây giờ dễ dàng khi bạn đã có dữ liệu từ Forge, việc của bạn bây giờ là tạo ra một Stream và gửi dữ liệu đó lên Speckle.
import pandas as pd
# create a stream
new_stream_id = client.stream.create(name="ForgeData")
# get a stream
new_stream = client.stream.get(id=new_stream_id)
pd.DataFrame(new_stream)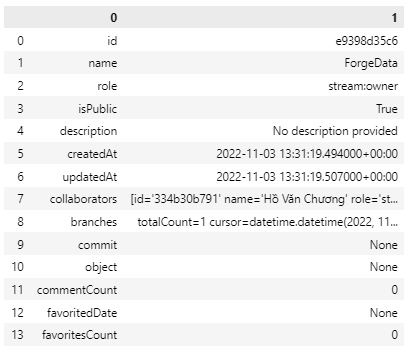
Việc của bạn tiếp theo là khởi tạo lại base một đối tượng project với thông tin thuộc tính như Forge và gửi nó lên Speckle.
from specklepy.transports.memory import MemoryTransport
from specklepy.api import operations
from specklepy.transports.server import ServerTransport
from specklepy.objects import Base
class Projects(Base,speckle_type="testproject"):
    type: object
    id: object
    attributes: object
    links: object
    relationships: object
    def __init__(self, type, id, attributes, links, relationships):
        self.type = type
        self.id = id
        self.attributes = attributes
        self.links = links
        self.relationships = relationships
allprojects = []
for i in range(len(projests["data"])):
    type = projests["data"][i]["type"]
    id = projests["data"][i]["id"]
    attributes = projests["data"][i]["attributes"]
    links = projests["data"][i]["links"]
    relationships = projests["data"][i]["relationships"]
    project = Projects(type, id, attributes, links, relationships)
    allprojects.append(project)
myobj = Base(speckle_type="AllProject", data=allprojects)
    # next create a server transport - this is the vehicle through which you will send and receive
transport = ServerTransport(client=client, stream_id=new_stream_id)
    # this serialises the block and sends it to the from specklepy.transports.server import ServerTransport
hash = operations.send(base=myobj, transports=[transport])
    # you can now create a commit on your stream with this object
commid_id = client.commit.create(
        stream_id=new_stream_id,
        object_id=hash,
        message="this is a project I made in speckle-py",
        )
print("Done")Ta đa, và bây giờ bạn có thể kiểm tra toàn bộ dữ liệu của bạn đã trên speckle rồi. Cần lưu ý rằng, chỉ dữ liệu được tải lên và không bao gồm đối tượng hình học để xem trước.
Chúng ta thử với một vài hàm để lấy dữ liệu trở lại từ Speckle xem sao.
# Get Data Again from Speckle
# url = https://speckle.xyz/streams/a7313af2cf/commits/2fa3c233c2
stream_id = "a7313af2cf"
commitid = "2fa3c233c2"
branchName = "main"
wrapper = StreamWrapper("https://speckle.xyz/streams/a7313af2cf/commits/2fa3c233c2")
client = wrapper.get_client()
transport = ServerTransport(client=client, stream_id=stream_id)
commit = client.commit.get(stream_id, commitid)
res = operations.receive(commit.referencedObject, transport)
res["data"]Kết quả :
[Base(id: ee4c59a796e60b537543cca41d9c3e08, speckle_type: testproject, totalChildrenCount: 0),
Base(id: c637fc08335e9b1924895343735b386e, speckle_type: testproject, totalChildrenCount: 0)]Và thử lấy về thuộc tính thông tin của dự án đầu tiên.
datas = res["data"][0]["attributes"]
datasKết quả:
{'name': 'Sample Project - Seaport Civic Center',
 'scopes': ['b360project.ad33088f-5e47-48aa-956d-836a1b055580',
  'O2tenant.32914228'],
 'extension': {'type': 'projects:autodesk.bim360:Project',
  'version': '1.0',
  'schema': {'href': 'https://developer.api.autodesk.com/schema/v1/versions/projects:autodesk.bim360:Project-1.0'},
'data': {'projectType': 'ACC'}}}Với Speckle vẫn chưa chính thức để xác nhận kết nối với Forge, chúng ta hãy cùng chờ thêm một thời gian để làm tiếp một bước nữa nhé.
Kết luận
Như vậy là mình đã hướng dẫn thành công giúp các bạn đưa toàn bộ thông tin dữ liệu của một dự án từ Forge API lên Speckle để có thể sử dụng được cho các mục đích khác nhau. Tùy vào mục đích mà dữ liệu sẽ được chuyển đổi và đưa đến người sử dụng đúng mục đích, đúng nhu cầu, sự thuận tiện và hiệu quả của nó.
Code mẫu hướng dẫn được chia sẻ tại : ForgePythonSDKConnectSpeckle.ipynb
Cuộc sống
ENIAC là một viết tắt của cụm từ Electronic Numerical Intergrator and Computer là máy tính kỹ thuật số đầu tiên có thể lập trình, điện tử cho mọi mục đích. Nó là máy hoàn chỉnh Turing và có thể giải quyết "một lớp lớn các bài toán số" thông qua việc lập trình lại. ENIAC có vai trò đưa phương pháp Monte Carlo phổ biến trong khoa học. Vậy phương pháp Monte Carlo là gì ?
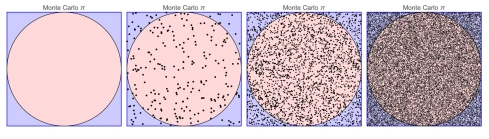
Các phương pháp Monte Carlo (MC) là một tập hợp con của các thuật toán tính toán sử dụng quá trình lấy mẫu ngẫu nhiên lặp đi lặp lại để thực hiện các ước lượng số của các tham số chưa biết. Lý thuyết trò chơi sử dụng tiền đề của phương pháp này rất nhiều để giải quyết. Điểm đến hôm nay là học về phương pháp Monte Carlo và cách sử dụng nó để giải quyết các vấn đề thực tế. Đi thôi Monte-Carlo integration